When it comes to houseplants, few are as captivating and rewarding as the Calathea. I remember the first time I brought one home—it felt like adopting a little piece of the rainforest. With its vibrant foliage, intricate patterns, and unique movements, the Calathea has earned its reputation as a must-have for plant enthusiasts. But let me tell you, these beauties aren’t just about looks; they demand care, attention, and a bit of understanding. Over time, I’ve learned that nurturing a Calathea is more than following a set of rules—it’s about building a relationship with your plant.
In this guide, we’ll dive deep into everything you need to know about caring for your Calathea. From understanding its natural habitat to mastering watering techniques, humidity levels, lighting needs, and troubleshooting common issues, I’ll share my personal experiences and tips to help you keep your Calathea thriving. Whether you’re a beginner or an experienced plant parent, this article will equip you with all the tools you need to create a happy and healthy environment for your leafy companion.
Understanding the Calathea Plant
Before jumping into the nitty-gritty of care, it’s essential to understand what makes the Calathea so special. Native to the tropical rainforests of South America, these plants thrive in warm, humid environments where they receive dappled sunlight under the canopy of larger trees. This gives us a clue about their preferences when we bring them indoors. They love indirect light, high humidity, and consistent moisture—conditions that mimic their natural habitat.
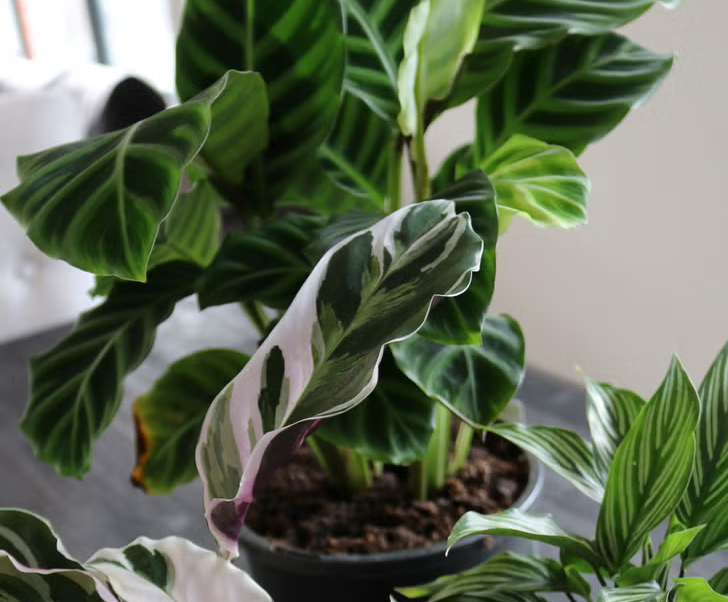
One fascinating aspect of Calatheas is their “prayer-like” movement. During the day, their leaves open wide to soak up light, and at night, they fold upwards, almost as if they’re going to sleep. It’s mesmerizing to watch and adds a touch of magic to any space. There are many varieties of Calathea, each with its own distinct leaf pattern and coloration. Some popular ones include the Calathea orbifolia, known for its large silvery-green leaves, and the Calathea zebrina, famous for its striking zebra-striped foliage. No matter which variety you choose, they all share similar care requirements.
Lighting Needs: Finding the Sweet Spot
Lighting is one of the most critical factors in keeping your Calathea happy. In my early days of plant parenting, I made the mistake of placing my Calathea on a windowsill that received direct sunlight. Within days, the once-vibrant leaves started developing unsightly brown spots. That’s when I realized how sensitive these plants are to harsh light.
Calatheas prefer bright, indirect light. Think of the filtered light you’d find beneath a tree canopy in the wild. East- or north-facing windows are ideal because they provide gentle morning light without the intense afternoon rays. If your home doesn’t have such windows, don’t worry—you can use sheer curtains to diffuse the light or position your plant a few feet away from a brighter window.
On the flip side, too little light can also cause problems. I noticed that when I placed my Calathea in a dim corner, its growth slowed down, and the colors on the leaves became dull. To prevent this, consider using artificial grow lights if natural light is limited. The key is balance—your Calathea should get enough light to thrive but not so much that it gets scorched.
Watering Techniques: Striking the Right Balance
Watering is another area where Calatheas can be a bit finicky. These plants enjoy consistently moist soil but hate sitting in waterlogged conditions. Overwatering is one of the most common mistakes people make, and trust me, I’ve been guilty of it too. Once, I watered my Calathea every other day, thinking I was being diligent. Instead, I ended up with root rot, and the poor plant nearly died.
To avoid this, always check the top inch of soil before watering. Stick your finger into the pot—if it feels dry, it’s time to water. If it’s still damp, wait a day or two. During the growing season (spring and summer), your Calathea will likely need more frequent watering compared to the dormant winter months.
Another important tip is to use room-temperature water. Cold water can shock the roots, while hot water is obviously harmful. Additionally, Calatheas are sensitive to chemicals found in tap water, such as chlorine and fluoride. I started using filtered or distilled water, and the difference was noticeable—my plant’s leaves stayed lush and spot-free.
Humidity Levels: Creating a Rainforest Atmosphere
Humidity plays a crucial role in Calathea care. These plants hail from tropical regions where humidity levels are naturally high, often ranging between 60% and 80%. Indoors, however, our homes tend to be much drier, especially during winter when heaters are running.
I quickly learned that low humidity could lead to crispy leaf edges and browning tips. To combat this, I invested in a small humidifier and placed it near my Calathea. It worked wonders! Alternatively, you can place a tray filled with pebbles and water beneath the pot. As the water evaporates, it increases the surrounding humidity. Grouping your Calathea with other plants can also help, as plants release moisture through transpiration.
Misting is another option, though I’ve found it less effective unless done multiple times a day. If you do mist, make sure to use lukewarm water and avoid spraying directly onto the leaves, as this can encourage fungal diseases.
Soil and Potting: Building a Strong Foundation
Choosing the right soil mix is vital for your Calathea’s health. Regular potting soil won’t cut it because it tends to retain too much water, leading to soggy roots. Instead, opt for a well-draining mix that retains some moisture but allows excess water to drain away. I’ve had great success with a combination of peat moss, perlite, and orchid bark. This blend provides the perfect balance of aeration and moisture retention.
When selecting a pot, ensure it has drainage holes. Without them, water can accumulate at the bottom, causing root rot. Terracotta pots are excellent choices because they allow the soil to breathe and dry out slightly between waterings. However, if your home is particularly dry, plastic or glazed ceramic pots may work better since they retain moisture longer.
Repotting should only be done when necessary, usually every 1-2 years or when the plant becomes root-bound. When repotting, gently tease apart the roots to encourage new growth and refresh the soil. Be mindful not to disturb the roots too much, as Calatheas can be sensitive to transplant shock.
Fertilizing: Feeding Your Plant Properly
Like all living things, Calatheas need nutrients to grow and flourish. During the growing season, I feed mine with a diluted liquid fertilizer every 4-6 weeks. It’s important to dilute the fertilizer to half or even quarter strength, as Calatheas are prone to fertilizer burn if overfed.
In the fall and winter, I stop fertilizing altogether. This mimics the natural cycle of nutrient availability in their native environment. Overfertilizing can lead to salt buildup in the soil, which damages the roots and causes leaf discoloration. Always err on the side of caution and monitor your plant’s response to feeding.
Common Issues and How to Fix Them
Even with the best intentions, problems can arise. One issue I encountered was spider mites. These tiny pests love dry conditions and can wreak havoc on your Calathea’s leaves. To tackle them, I increased the humidity around the plant and wiped the leaves with a damp cloth. For severe infestations, insecticidal soap or neem oil can be effective.
Yellowing leaves are another common problem. While occasional yellowing is normal, excessive yellowing often indicates overwatering or poor drainage. Adjust your watering schedule and ensure the pot has adequate drainage. Brown leaf edges usually signal low humidity or inconsistent watering. Boosting humidity and sticking to a regular watering routine can resolve this.
If your Calathea’s leaves start curling, it might be thirsty or exposed to drafts. Check the soil moisture and move the plant away from vents or doors. Lastly, if the vibrant patterns fade, it could mean insufficient light. Relocate the plant to a brighter spot, ensuring it’s still indirect light.
Propagation: Expanding Your Collection
Propagating Calatheas isn’t as straightforward as some other houseplants, but it’s definitely possible. The most reliable method is division, which involves separating the plant into smaller sections during repotting. Each section should have its own roots and stems to ensure successful growth.
I tried propagation once, and while it required patience, seeing new shoots emerge was incredibly rewarding. After dividing, plant each section in fresh soil and keep the soil slightly moist until the divisions establish themselves. Avoid fertilizing immediately after propagation, as the young roots are delicate.
Final Thoughts
Caring for a Calathea is a journey filled with learning and discovery. At first, I was intimidated by their reputation for being “difficult,” but over time, I came to appreciate their quirks and beauty. By paying attention to their specific needs and adjusting my approach accordingly, I’ve managed to keep my Calathea thriving.
Remember, every plant is unique, and what works for one might not work for another. Don’t be afraid to experiment and observe how your Calathea responds. With patience, dedication, and a little love, you’ll soon find yourself falling head over heels for these stunning tropical gems. So go ahead, embrace the challenge, and enjoy the joy that comes with nurturing a Calathea.